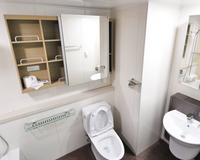
Parents have enough to worry about when they leave the house with a little one. Is there enough formula? Did they pack the extra pacifier? Where is the nearest restroom? The last thing they should have to stress over is the cleanliness of the diaper changing station in your facility. A pristine changing area isn’t just a nice-to-have amenity; it’s a critical component of customer service and public health safety.
When a parent walks into a restroom and sees a spotless, well-maintained Koala Kare or ASI unit, it signals that the business cares about their well-being. Conversely, a grimy station can ruin a customer’s perception of your entire establishment in seconds. Germs linger on surfaces long after a diaper change is complete, potentially spreading bacteria like E. coli, Salmonella, and Norovirus if not properly addressed.
These tips will help you sanitize your commercial diaper changing stations. We will cover the specific supplies you need, a detailed step-by-step cleaning process, and how to maintain a schedule that keeps your facility running smoothly. By the end, you will have a clear roadmap to elevating the hygiene standards of your restrooms.
Why Sanitization Matters
While most people understand that bathrooms need cleaning, diaper changing stations require a specific level of attention. These surfaces experience high traffic and handle biological waste, making them prime real estate for cross-contamination.
If a previous user places a diaper directly on the surface or touches the station with contaminated hands, the next child placed there is at risk. Young children have developing immune systems, making them more susceptible to infections picked up from surfaces. Furthermore, parents often put their diaper bags, wipes, and other personal items on the table, which then travel back home with them, potentially carrying germs out of your facility.
Beyond the health implications, the appearance of your changing station directly impacts your brand reputation. In the age of social media and online reviews, a single photo of a dirty restroom can go viral and deter potential customers. Maintaining a rigorous sanitization protocol protects your patrons and preserves your business’s image.

Preparing To Sanitize
Before you attack the grime, you must gather the right tools. Using the wrong products can either damage the equipment or fail to kill the bacteria effectively. Most commercial changing tables require specific care to maintain their durability and warranty.
The Essential Cleaning Kit
Start by assembling a dedicated cleaning caddy for your restroom maintenance. Having everything within arm’s reach makes the process efficient and prevents staff from cutting corners.
Choose a hospital-grade disinfectant registered with the EPA. Look for products labeled as effective against bacteria and viruses. Avoid abrasive cleaners or bleach-based products if the manufacturer’s guidelines advise against them, as they can degrade the plastic or corrode stainless-steel mechanisms over time.
Make sure you have microfiber towels and disposable paper towels on hand. Microfiber is excellent for trapping dust and dirt, but disposable paper towels are often preferred for the initial wipe-down to prevent cross-contamination between different areas of the restroom.
Staff should always wear disposable gloves to protect themselves from harsh chemicals and biological contaminants. Keep a mild dish detergent on hand, as you may need it. Sometimes, a simple mix of soap and water is necessary for the initial cleaning phase to remove sticky residue before disinfecting.
Safety First
Before applying any chemicals, check the ventilation in the restroom. Fumes from cleaning agents can build up in small spaces. Read the safety data sheets (SDS) for all your cleaning chemicals to understand the risks and first-aid measures. Always place a “Wet Floor” sign near the area if you are using spray bottles, as mist can settle on the floor and create a slipping hazard.
Step 1: Clear and Inspect
Open the unit fully. Remove any large debris, such as left-behind wipes, diaper liners, or trash. Inspect the unit for damage. Check the safety strap to verify it is intact and functioning. Look for cracks in the plastic or loose hinges. If the unit is damaged, take it out of service immediately for repair or replacement.
Step 2: The Pre-Clean
Spray the surface with a mild detergent or a general-purpose cleaner. If you are using a disinfectant that also acts as a cleaner, you can use that, provided the surface isn’t heavily soiled. Wipe down the entire bed of the changing station, paying close attention to the corners and the safety strap. The strap is often the most overlooked part of the unit, yet everyone touches it.
For textured surfaces, use your soft-bristled scrub brush here. Gently scrub in a circular motion to lift any grime embedded in the plastic’s grain. Wipe away the dirty cleaning solution with a paper towel and dispose of it.
Step 3: Apply Disinfectant
Now that the surface is visually clean, it is time to kill the pathogens. Spray your EPA-registered disinfectant liberally over the entire changing surface, the safety strap, the handles, and the exterior of the unit. Do not forget the dispenser area where sanitary liners are stored.
Step 4: Mind the Dwell Time
This step is the most critical one that many people skip. “Dwell time” or “contact time” is the amount of time a disinfectant must remain wet on a surface to kill bacteria and viruses effectively. This information is on the label of your disinfectant bottle. It usually ranges from three to ten minutes.
If you wipe the spray off immediately, you are essentially just moving germs around. Let the product sit and do its work. Use this time to clean the restroom mirror or refill soap dispensers.
Step 5: Wipe and Dry
Once the dwell time has passed, wipe the surface dry with a clean paper towel or a fresh microfiber cloth. Make sure no chemical residue remains, as this could irritate a baby’s sensitive skin. If your disinfectant label requires a clear-water rinse, wipe the area down with a cloth dampened with plain water, then dry completely.
Step 6: Restock
Refill the sanitary bed liner dispenser. These liners provide an extra layer of protection and peace of mind for parents. If your unit includes a diaper disposal kit or bag dispenser, check and refill those as well. Close the unit (if it is a fold-down model) and wipe down the exterior one last time to make it presentable for the next user.

Maintain Consistency
A one-time deep clean is great, but consistency is key. Bacteria grow back quickly, and a busy restroom sees constant foot traffic. Implementing a solid maintenance strategy creates a standard of excellence that keeps your facility safe.
Establish a Cleaning Frequency
The frequency of cleaning depends on the traffic your facility receives. High-traffic venues like airports, shopping malls, or busy restaurants should check and sanitize these stations hourly. Lower-traffic offices or smaller boutiques might only need a thorough sanitization twice a day—once before opening and once mid-shift.
Create a log sheet and mount it on the back of the restroom door. Staff should initial and time-stamp every time they clean the changing station. This symbol adds accountability and allows management to verify that they’re meeting standards.
Effective Staff Training
Your cleaning protocol is only as good as the team executing it. Train your staff specifically on the difference between cleaning and sanitizing. Show the team how to read the chemical labels to find the dwell time. Consider holding a quarterly refresher course on hygiene standards. Use this time to introduce any new products or to go over customer feedback on restroom cleanliness.
Choose the Right Equipment
Sometimes, maintaining cleanliness is difficult because the equipment itself is outdated or degraded. Old, scratched plastic can harbor bacteria deep in the fissures where disinfectants can’t reach. If your facility’s units are showing their age, consider upgrading to modern, antimicrobial units.
Brands like Koala Kare and ASI now offer units with Microban® antimicrobial product protection embedded into the plastic. While this doesn’t replace the need for regular cleaning, it provides an added level of defense against odor-causing bacteria between cleanings. Whether you need a horizontal surface-mounted unit or a stainless steel recessed model, choosing high-quality equipment makes the sanitization process easier and more effective in the long run.
Prioritize Health and Hygiene
Cleanliness is a language that every customer understands. When a parent unfolds a changing table and sees a gleaming, sanitary surface, they feel valued and safe. It builds trust in your business and sets you apart from competitors who might overlook these details.
By following the steps and tips outlined above, you will sanitize your commercial diaper changing stations properly. Take the initiative today to review your restroom cleaning protocols. A small investment in time and training yields a massive return in customer satisfaction and safety.